Press All the Things…

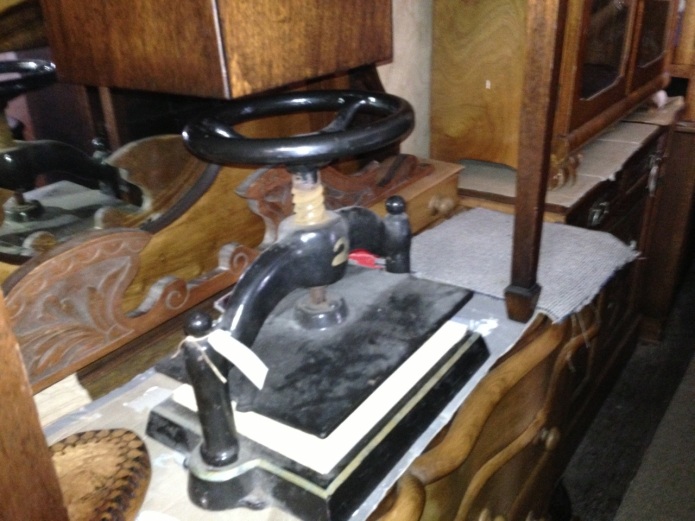
So I finally managed to get my hands onto a nipping press. It is a lovely little cast iron baby, with a turn-wheel instead of a handle. It’s in pretty good nick: the paint is peeling in a couple of places and the screw is a bit rusty (luckily it only looks like surface rust).

You may remember that I was planning to make my own nipping press from wood. Well, that’s not going to happen any more is it? It’s probably a blessing in disguise so I’m not that worried about it. I may still build one and sell it. Would you be interested in buying a wooden nipping press? I have a few projects on at the moment, so one less is no worries.

I’ll post some more pictures once I’ve cleaned it up a bit.

Happy bookbinding!

Crafty Day With My Wife

We had a birthday to go to today (sorry Tobi!) but my wife Sharon and I have been very busy lately so we stayed home, and ended up having a crafty day. She was making some felt flower brooches and beading, and I’ve been working on some books. One is a rebinding of a paperback, and one is a new blank book. Thank God for lazy days!

Pamphlet Stitching For People Who Want To Try It

OMG My 2nd Tutorial

OK so this is my second tutorial, and it comes straight after my last post which was also a tutorial. Freaky. I like sharing my knowledge, so expect to see more. And, please comment and help me improve in any way—if it needs it. I love getting comments anyway so comment away!

Pamphlet Stitching is Easy

As you may know, this stitch is intended for thin, single-section pamphlets, and can be used in a few simple binding structures. I have used it in the past for other things as well, like birthday cards for my wife and our wedding invitations, both of which consisted of a heavy (200gsm+) cover and a lighter sheet of paper as the single section. It is very easy to learn and adapt to your own needs.

All Pamphlet Stitched Up

Above is an illustration I created to enable the visual among us (like me) to see what to do instead of interpreting a confusing list of in-this-hole, out-that-hole instructions. I started to type out a list of instructions, but it started to get long-winded and probably not very easy to follow. However, if you want me to I’ll include them.

On thing I didn’t include in the diagram is the final knot. You should use a reef or square knot. My colleague gave me this little ditty to remember how to tie it: right over left and under, left over right and under. Right and left in this case refer to the right an left ends of the twine or thread. Make sure that you start the knot with the thread ends on either side of the long stitch so that the knot ends up holding onto it.

To do a 3-hole stitch, simply cut out the last loop to the left and right in the above diagram; to do more holes, just add more in-and-out loops. It is possible to sew an even number of holes—you’ll just end up with an uneven number of stitches either side of the knot. In either case, don’t try starting sewing at the last hole.

What You Need for a Very Simple Book or Card

You will need the following tools and materials:

  • Text paper—1 if you’re making a card, more if you are making a book.
  • Cover-weight card. For the cover. About 200–300gsm is good.
  • Thread, twine, or string—about 3 or 4 times the length of your spine.
  • Bookbinding needle (you don’t even have to use a needle, just make the holes bigger each time you pass thread through).
  • Bodkin or Awl, or something else spiky. The sharper the better.
  • Scissors or knife.

You do not have to have shiny new expensive bookbinding tools—use whatever you have that will get the job done. In the past, I have used bamboo skewers to pierce the holes for little pamphlets, and some plasticky type of string instead of linen thread or whatever. Also, you do not have to be too exact with your sewing-hole placement—random can be quite cool.

With the paper and cover stock, make sure that your grain is in the right direction. I mostly cut A4 in half parallel to the short edge to give me 2 A5 sheets, which I fold in half again to give me an A6 notebook. Because A4 office paper is usually long-grain, this means that I end up with short-grain A5 sheets which are perfect in the grain direction department.

Steps to Success

  1. Gather your tools and materials

  2. Fold your text pages and cover in half

  3. Pierce your holes (freehand it or measure-and-mark it)

  4. Sew the pages together using the instructions above

  5. Et Voila! You now have a little notebook, created in four (4) steps.

The End

I hope you liked this little tutorial. It actually turned out to be a two-in-one: how to do a pamphlet stitch, and one idea about using it.

I’m trying to keep the posts up, in an effort to keep my readers interested. More to come soon, including a proper look at what I gave a sneak peek of a little while ago. I am also planning a bookbinding phrasebook section of my website. Stay tuned.
Little Sacks of Weight

Heavyweights II

Weighing in at 750g…

I made these heavy little guys soon after I started bookbinding. My first bookbinding teacher Rosemarie inspired me to create them one lesson. They are great for holding things down (duh), especially when I am sewing sections together. I also use them when something has to dry under weight. I prefer them to a heavy block of metal or a brick because they are soft and supple, they feel nice, and because the make a cool sound when I toss them from hand to hand; they also double as stress balls. They will not dent your boards or whatever when you drop them either. They are dead easy to make; one just has to find a gun shop that will sell one some lead shot. I forget the size I got. Make sure when you do get some that you put them into a strong container—or several—because man it is heavy for its size.

Heavyweights I

How to Make a Heavy Leather Bag of Lead Shot

This is pretty easy so I won’t even explain each step, you’ll be able to figure it out.

  1. Get some lead shot and put about 750g into a separate container.
  2. Cut yourself a template from some breakfast-cereal-box card according to your desired size. Remember to allow for your seam.
  3. If you’re using leather and hand sewing, I recommend pre-punching holes. I marked the holes’ positions on the template so I’d get an evenly spaced blanket stitch.
  4. Cut two pieces of leather, old jeans, or some other heavy fabric according to your template.
  5. If you’re using leather, use your awl if you have one to pierce holes for sewing. Remember to protect your work surface.
  6. Start sewing around the outside of the paper weight with some strong thread. In the picture above, the red and the white stitching is linen bookbinding thread, while the blue is a couple of strands of embroidery floss.
  7. Once you have only about 2–3cm remaining, make a funnel from some heavyish paper (roll it into a cone, then cut a hole at the bottom, and cut the top down so it’s manageable), and pour your shot in. If it all won’t fit, or you need more, that’s cool, just play it by ear.
  8. Complete the sewing
  9. Et voila! You have a heavy bag of lead. Use it for peaceful purposes only.

If you want to make it more secure, you can either use a sewing machine, or make an inner bag out of some thin strong fabric—preferably sewn using a machine—and cover that in the leather or your covering material of choice. Also, I wrote this with blanket-stitching in mind. If you wanted to use another stitch you’ll have to mark and pierce holes according to whatever stitch you’re using.

My First Tutorial

That was just it. Please let me know if it needs editing or a bit of clarification. Just let me know.

PS: I wonder how many Higg’s Bosons a little ball of lead-shot has…

Le Palais de Poulet

Le Palais de Poulet

C’est la fin!

I at long last completed construction of a lovely chicken coop for my 4 chickens. I started it last year at Easter time, and worked on it each school holiday after. It was a real education to build, and a test of my skills.

I used mostly materials that I scrounged, except for the chicken wire, the corrugated zinc, and the nails and screws. I’m really proud and take pleasure in the fact that I didn’t buy all the wood; as you can see above, the timber—mainly the reused fence palings—has such character, and is pretty sturdy, and didn’t cost me a cent.

The Rewards

We get a few eggs a day from our 4 girls, and they are lovely to eat, and share among the family. Part of the reward is financial, with the eggs saving us a bit of money here and there. It’s nothing that will pay off the home loan in 10 years, but it all helps. It is also rewarding being a little more self-sufficient, and relying less on the shopping markets. With our vegie garden, we can nearly eat whole meals where everything has been produced at home.

Our Ladies

Our lovely girls. L–R: Milly, Ethel, Black Betty, and Bethel

Meet the Ladies

We have four hens, two are about 3 or 4 months older than the other two, and we’ve had two die—one just dropped dead mysteriously after a week, and one died after an injury to its leg. We first got Ethel and Bethel at 16 or 17 weeks old. Then we had three 7-week-old chicks given to us by a friend. They all turned out to be roosters. We couldn’t believe it and were a little traumatised when we gave them away. We then got three new pullets from the hatchery nearby and now we have the four. Ethel is a Leghorn crossed with an Australorp and is a bully, Bethel is a lovely and gentle Australorp cross Rhode Island Red. Milly is a pure Rhode Island Red, and Black Betty is a pure Australorp.

If you’ve never had chickens before and are thinking about it, jump in because they are great fun, and you get more than you put in.

Giles’ Photo Album

Giles’ Photo Album: Spine Detail

My First Foray into Fine Binding*

I made my little godson Giles this photo album during a course in Bookbinding I did at Amazing Paper a few years ago. I had opportunity to create a leather-bound book, and I thought that I might as well create a photo album for my new nephew and godson.

To be different and get away from one of the standard paper sizes, I decided to create the album from 25 black A3 sheets (420 × 297mm) cut lengthways (420 × 148.5mm). The sheets were actually 25mm wider than standard A3 to allow a fold-over and still get a full A3 width. After scoring and folding each of the 50 pages, I placed each one inside the other to create 25 sections, which I then lovingly pierced and sewed with lovely red linen thread. Next I glued tracing paper, cut to give a 3mm square, into each section. After gluing, I rounded and backed, and created the hollow-back, and dressed the spine.

Giles’ Photo Album: Cover Detail

Because of the unusual size of the book, and because I was doing a leather binding, I laced the covers in with the tapes I had sewn on to. I then proceeded to cut the embossing for the front and back covers. The rest of the process was pretty standard, and I won’t go into too much detail.

Needless to say, Giles’ parents loved the photo album.

Giles’ Photo Album: Interior Giles’ Photo Album: Cover

* Insofar as any binding with leather is considered fine