Press All the Things…

So I finally managed to get my hands onto a nipping press. It is a lovely little cast iron baby, with a turn-wheel instead of a handle. It’s in pretty good nick: the paint is peeling in a couple of places and the screw is a bit rusty (luckily it only looks like surface rust).

You may remember that I was planning to make my own nipping press from wood. Well, that’s not going to happen any more is it? It’s probably a blessing in disguise so I’m not that worried about it. I may still build one and sell it. Would you be interested in buying a wooden nipping press? I have a few projects on at the moment, so one less is no worries.

I’ll post some more pictures once I’ve cleaned it up a bit.

Happy bookbinding!

Adhesive Binding is Perfect

It’s Been a While

So this is the post where I apologise to all my readers for not posting for so long: sorry! I have a good excuse—he is 6 months old soon. I have had a busy time at work, and have been engaged in other creative pursuits, bookbinding being just one of many creative things I love to do.

Believe it or not I love writing computer programs. I just love it. I started off at Uni teaching myself C++, I learnt Pascal, HTML, JavaScript, did some Prolog, and a whole lot of Windows API programming and ASP with VBScript. I can get myself into trouble with a bit of ConTeXt, SQLPHP, and CSS. Now I code in C#, and I am learning Objective-C and Cocoa, Regular Expressions, and I am becoming a Bash nerd.

Anyway, I don’t want to freak you out or anything.

Pictures are Worth Heaps of Words

I thought that it would be an excellent idea to not type another word, and just let my pictures do the talking. So here is an image gallery of the steps involved in adhesive binding.

The Craft and Trade of Bookbinding

The Lonely Tree

I have always appreciated the multi-dimensional aspect of bookbinding. It is neither solely a creative outlet of beautiful works of art, nor solely a trade producing an object that must be usable and durable (and saleable): for me it us both of those things at once. I love that as bookbinders, we are creating something that is nice to look at, to touch, and to hold (and listen to: I love the sound when I snap a book closed, or the sound of a finger tapped on a closed book’s cover, dok dok dok), but also serves a definite purpose as an information repository, a place to pour out one’s heart through words or pictures, or as a vehicle transporting one to another world via a great story—books are there to be used.

In days gone by, bookbinding by hand was a big trade, with lots of workers all performing separate tasks in big factories. All this has now been mostly superseded by some amazing machinery (and amazing people who run them), and has now become a niche trade with only a few companies around maintaining the old ways, some of whom also maintain the old books. Mostly, hand bookbinding has become an art-form, a hobby for people like me and perhaps you. Nevertheless, I believe it is still important that we who practice this trade–craft as a hobby learn the skills, techniques, and methods of traditional tradesmen and women.

Since starting my Bookbinding and Restoration course at Sydney Institute of TAFE, this trade aspect of bookbinding has really been made apparent to me, because that’s how bookbinding is taught: as a trade. So we learn all the ‘right’ ways to do things, practices that with practice (!) will become second nature, and will result in a high-quality, well made book. We are not really given much opportunity for creativity (unless you’re a rebel like me and use random bits of waste paper as end-sheets!) but it is only the first semester of the course. I am not complaining. As I mentioned above, I think it is a good thing to know all the rules and the right ways of doing things—after all, doesn’t one need to know the rules to break them?

I yearn for the chance to create a book beautifully bound in leather with a beautiful design tooled into the covers. I also yearn to create books that are well-made and that will last. I look forward to learning the more decorative skills, but I look forward with as much eagerness to learning better bindings, and to bettering my skills.

The Making of a Diary for Someone Who Doesn’t Use Diaries

And That Someone is Me

I gave a sneak peek a little while ago on a project I was working on. Well, I completed it, and have used it for about 6 or 7 weeks. It’s a school diary with a difference, and represents my efforts to get more organised and to manage my time better.

So far, it has been a moderate success—I have actually written in it and made notes and to-dos, which is more than I can say for any other diary I’ve owned in the last 10 years. I however need to move from using it more as a record to using it as a planning tool.

The Design

There were a few things that I considered (not specifically) when I was planning my diary. They were:

  • what I wanted the book to look like, inside and out
  • that I wanted something which would be useful and realistically so
  • and that I didn’t want it completely utilitarian, but a little bit fun.

Form

I designed my diary to look funky and colourful, unlike the drab, monochrome, boring diaries that you buy off the shelf. The look is something that is very important to me, being a visual person. When deciding what colours to use, I used the four process colours of Cyan, Magenta, Yellow, and Key (black)—the CMYK colour model. Whenever I can’t think of colours to use, or I don’t have anything specific in mind, I end up using CMYK. I used another colour—Orange—for all the writing lines and grid lines etc.

Function

I also kept it functional and focused on its purpose of being a school diary with a difference. I decided early on that I wanted a week-to-an-opening view: being realistic, I knew what I was like with diaries, so I kept it simple. I came up with a layout where the days-of-the-week are on the verso and a space for notes and to-dos is on the recto. The verso is divided into 6 sections: a heading which tells me the term and week-number, and the month, and one for each day of the week. The days-of-the-week are further divided into spaces for each lesson of the day. Also, for a bit of fun, I included some cool ‘days’ like World Migratory Bird Day on the 14th of May (OK it should have been the 12–13th but my diary doesn’t do weekends and the original source I got the date from was wrong!), and Star Wars Day on May the Fourth. I also have a personalised timetable and a larger notes and to-dos section at the front of the book, and an assessment record at the back.

In terms of the binding itself, it is case-bound and quarter covered with Limette Duo book cloth and Kraft paper (I love Kraft). I’m really pleased with the result functionally. The hinges work really well—I was a bit more generous with them this time around, allowing the standard 2-and-a-half thicknesses of board‐and the whole thing is nice and square.

Personality

I just had to express my personality when designing this diary, and make it unique. As mentioned above, I included interesting ‘days’, and I did other things, like put in a photo of me and my wife, and give it a title page: The School Diary of Jacob Degeling. For a bit more fun, I included some grids for when I’m bored during meetings etc.—they are a 2mm square grid and an isometric grid.

Trial by Use

Something that I am very interested in is to see how my binding stands up to everyday use. So far structurally the book is doing well. The only thing I might change next time I bind a book like this is to use a thicker spine hollow (the piece of cardboard that covers the spine) because the thin card I used is deforming at the head and tail, and it shows the lumps and bumps from the sewing and the tapes. The paste I used to attach the Kraft was a bit thin, so some parts of the paper are starting to lift, especially where it overlaps the book-cloth. I’m just going to leave it to see what happens.

There is a little bit of wear and tear on the cover, most notably the Kraft is starting to fray a bit around the edges, there are a few coffee cup rings on it, and the quarter-cloth is getting a bit dirty from me holding the book by the spine. Also, I got some honey from a sandwich I ate one day on it which a mouse has just nibbled off over night taking some of the paper with it.

I’m pretty happy overall with my new diary. And I think I might just get used to having one around.

Thanks for reading, and happy binding!

Video: Casing In with Rhonda Miller

Very good demonstration of how to case in a book. When she does the first side and then opens it, I almost fell off my chair! But it seems to work for her. It has been drummed into me that you never open a book that has just been cased in and is still wet. We’ve all done it though, if only once!

Blocking a Title and Stabbing a Spine

A Tantalising Taste of Foil Blocking

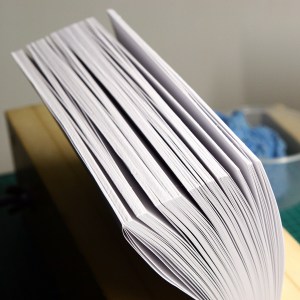
As I may have said before, one of the great things about having a different teacher is that they have different ways of doing things, and it’s great to have one’s eyes and mind opened by them. One of the things we’ve been working on was an adhesive binding of the free ebook Bookbinding and the Care of Books. It’s taken three lessons to bind it, make the case, block the title, and finally case the book in.

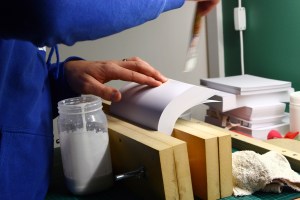
Foil Blocking is where the title of the book is impressed into the cover and spine. It is a similar process to letterpress printing but instead of ink, we use foil of various colours and types. In times past actual gold foil was used, but today a plasticky type of foil is the medium of choice.

For this project, the instructor set the type into the chase, using furniture to space the lines, and a quoin to tighten it all together. Don’t you just love the language? A chase is a kind of tray that fits into a blocking press and is used as the carrier for the type. Furniture are spacers of certain thicknesses that are used to evenly set spaces between lines. Finally, a quoin is an ingenious little device that expands and contracts as an inset screw is turned one way or t’other.

I was naïvely hoping to be able to set my own title, but this of course is not practical in a class of 8 novices. After the type was properly set, the instructor set up the blocking press, which had been left to heat up, so that it was all very easy for us novices to put our cases and foil in and pull the lever to leave behind a lovely title in gold or silver foil. The next thing we did was a little surprising: we got some oil from our skin—around the nose or forehead—and rubbed it over the title to get rid of any little bits that were out of place. Who said bookbinders weren’t a weird bunch?

So during the demonstrations and construction, I learnt a few new ways of doing things, and some better practices. One was that when the you’ve made the case, put the text block into it in its proper position, close the case then rub along the hinges with your bone-folder to help set the joint. Once the case dries, it will be easier to case in the text. Another was that it’s OK to use PVA to case the book in. I had always stuck to paste (no pun intended!), just because that’s how I was first taught. One of the main advantages of PVA is that it dries much faster than paste, so once the book has been nipped in the press, it can be opened and inspected. No more waiting overnight for a book to dry, no more getting up in the morning and hurrying into my bindery first thing to see if the book turned out OK. I like that paste is reversible, but I think that it is a bit over-the-top for what I do, at least for the moment.

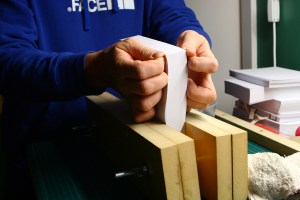
A Colourful Stab Binding

My first experience of this type of binding was a few years ago now when I made a 10-page A5 journal with A5 card covers and decorative endpapers. A couple of things were different this time around: the cover is a wraparound instead of single sheets of card, the pages are A4 folded in half with the folded edge at the foredge instead of single A5 sheets, and because of its thickness, the holes were drilled on the paper drill, not punched with an awl.

Folding, Bundling, Sewing, Smashing

We were given 10 pages each of 5 different colours, and commenced folding. Once we had folded everything, with all the colours together in separate bundles, we stacked them with pressing boards between each colour, then gave them a half-hour-long squeeze in the nipping press.

Our instructor told us that the process above was referred to as folding and bundling. If the book were to be sewn in sections, it would include the steps of sewing and smashing—smashing referring to knocking out the swell caused by sewing with a hammer. Once again, bookbinding terminology is simply wonderful.

Once we had folded and bundled our pages, we gathered them together into the right order—in this case the order is arbitrary as the pages are blank. After folding the cover, we drilled the holes, and sewed the book together. I enjoyed making this book because it was a bit different to what I had done before.

Madame Guillotine

Last time I posted about my TAFE course, I promised that I would wax lyrical about my experience using TAFE’s electric guillotines. Let me just say that it is amazingly fun, and that my fascination with sharp stuff has reached another high. The mechanical noise that emanates from the machine when you operate the foot pedal to lower the clamp and then when you strike the knife…ah! such unstoppable power. It is also about the accuracy of the machines—down to 1⁄100th of a millimeter. Accuracy is my other vice, although its pursuit does not always result in it! When working with wood—especially when I made my chicken coop—I have learnt to try to not be too accurate, but to lower the standard from 100% to 95%, which still provides an excellent result, but not at the expense of the whole project itself. Often I would try to be so accurate that my inevitable failure would result in me being completely downhearted and not even finishing the project.

…And On

That’s it for another post. This one took me 10 or 11 days to complete. Hopefully my next one will be a bit sooner, but two weeks is fairly OK I think between posts. At TAFE, I continue binding a really thick (23mm) slab of paper in the Japanese style, but this time with a hinged hard cover. Photos to come.

The Best Way to Read an eBook

A Bit of Inspiration

So I read this post the other day about binding a copy of Edgar Rice Burroughs’ A Princess of Mars, and I thought to myself, “Sounds like an interesting novel, and it looks like that movie John Carter is based on it. I might head over to Project Gutenberg to see if I can download it and bind it”. I got inspired by the trailer I had seen of the movie so I did. And I finished binding it the other night and am just finished reading it. Getting it print-ready was another story though.

I decided to retry TeX (after previously attempting to produce a printable PDF of Pride and Prejudice), and spent an inordinate amount of time prodding and poking among its many vagaries and eventually came up with the PDF document I used to print the text. There are some errors it, such as some American to Australian English spelling left overs, some errors in the TeX markup (typographic quote markup mistakes), and some things which I should have removed, but didn’t. I am working on them, and hope to release an updated PDF in the future. If you want to try TeX for yourself (specifically ConTeXt), you can email me for the TeX file. Unfortunately I cannot upload the file itself as WordPress.com only allows certain file types—among which are Microsoft Office documents, go figure.

After printing the book and realising that I had those few mistakes and that the grain is in the wrong direction, I decided to press on with binding it, but rather than doing a nice case binding, I chose a quick and simple method: the Japanese Stab Stitch book. I drilled the holes after clamping the book tightly between a block of wood and a bit of board with my trusty hand-drill and a 3mm twist bit. It worked rather well, and left some nice and neat holes for me to sew up using some nice cord I bought ages ago.

So I present to you the newest e-reader: the book.

My E-Reader’s Pros

  1. It won’t run out of battery, and it doesn’t need charging.
  2. It won’t get stolen, and other people won’t look at it and judge me for not having the latest bit of technology.
  3. If I drop it, it doesn’t shatter into a googolplex of small pieces.
  4. It looks and feels like a book, because it’s a real book.
  5. It can be written and scribbled on with ease.
  6. It teaches me about patience because I need to wait to get the book ready before I can read it.

And Its Cons

  1. I can only ever read one book with my book; it can’t become another book with the touch of a button.
  2. It won’t magically repaginate itself after I turn it on its side.
  3. It takes ages to get it set up satisfactorily into the format I want it.
  4. Holding open a book that is stab-stitched (and where the grain is in the wrong direction) for any length of time is tough work on the thumbs.

I am sure there are more, and even more funny slash witty ones.

What Did I Think of the Book?

I really enjoyed the book. I loved the contrast of the almost archaic language and the contemporary themes of science fiction and exploring other planets. I have just read—reread in some cases—a lot of the Sherlock Holmes stories by Sir Arthur Conan Doyle, so I was used to the language. In some parts, I cringed at the now sci-fi slash fantasy language clichés, but when you think that this book is the grand daddy of most modern sci-fi, it is forgivable. I can’t wait to see the movie—it has gotten pretty bad reviews, I’ve heard, but one of my colleagues who has seen it thought it was very good, but said you had to go into it with the understanding that not much will be new, because it is such an old story and has been the inspiration (indirectly) for much of the sci-fi of today.

What’s Next?

Well, I am in the middle of preparing the next book in the Barsoom series, The Gods of Mars, into a printable PDF. I thought I’d go for something a bit different, and print it as A4s 2-up on A3 (so each A3 would contain four pages), and arrange the text into two columns. I am planning on this book to do a case binding, because the stab stitch binding makes the book too hard to keep open. It is an experiment, and I hope that the columns will make the text more readable. I am also planning to set up the page margins according to the Canons of Page Construction, and in particular, this guide, which helps a book designer construct a page so that the margins and text areas are pleasing to the eye.

Why Are My Headings All Questions?

I don’t know, but I’ll keep you posted. Incidentally, I took all the photos for this post with my iPhone 4S—not too shabby, huh?